In the second and final part of this short series, I’ll setup Webpack “production” (cache-busting) builds and add script tags (from Webpack created file names - with hashes) dynamically from C# in ASP.NET Core.
You can find Part 1 here: /asp-net-core-and-webpack-part-1/
The code for both Parts 1 & 2 can be found on Github: https://github.com/ry8806/ASPNETCore_Webpack
Why is this necessary?
Running developement and production environments are very different. Especially in the JavaScript world.
When running in development, you’re likely to have your Dev Tools window (F12) open, local cache disabled (or just constantly mashing Ctrl/Cmd + F5/R).
We do this to tell the browser to go and fetch the JS/CSS from our server everytime we hit the page, as we’re likely making changes to this code, we’re going to want to see those changes and not the cached versions from our browsers.
…NOTE: There is a feature in Webpack called “Hot Module Replacement” (HMR). I’m not going to dig into that here, but it’s cool and defintely worth a look for streamlining your developement process (as it stops you having to constantly refresh pages) - it injects your new code as you’re on your webpage. Instead I’m going to demonstrate a process I use, which is much easier to set up.
When we deploy to the world wide web, users of our websites won’t be sitting there with Dev Tools open. So how do we guarantee their browser picks up our new JavaScript when we deploy a new version of our site?
For example:
We have a JS file (<script src="home.js"></script>) that’s downloaded as part of our homepage and is called home.js, the browser will cache this, it’s trying to be efficient and believes that the file contents wont change. When we move away from the homepage and go back - the browser will search it’s cache to see if it already has a copy of home.js, it does, so it’ll use the version it cached earlier.
Now suppose we find a bug in home.js, fix it, deploy to production.
We’re expecting to see our users reporting that the bug has been fixed, but they aren’t. You check the server and the server has the new (fixed) version at home.js, but users are still reporting the same bug.
This is because their browsers aren’t aware that anything has changed with the file and the browsers are still serving up the buggy version (that the browser cached earlier) instead.
….A manual, terrible solution
So our users are still seeing the buggy version of our js we deployed to begin with. We have two manual solutions to this problem, neither would I recommend…
- Rename our
home.jsfile tohome-v1.js, and change ourscripttag to point to the new file. This works just fine, but is too manual, you’d have to keep track of what numbers you’ve used. Also, as the number of JavaScript files in your application increases, so does your hassle - Similar to the first, however this time we can append a Query String to the
srcattribute in thescripttag (<script src="home.js?v=1"></script>). This means you don’t have to change the filename of the JavaScript file everytime you change it. But you will have to still increment thesrcattribute. The browser will treathome.js?v=1andhome.js?v=2as different files. Again, this works, however both are too manual and incrementing numbers is not a great use of our time.
Webpack comes ready for this
The developers at Webpack have thought about this and have added functionality for us to generate minified versions of our code and to generate unique filenames for our JavaScript files (by appending file hashes).
The Code
https://github.com/ry8806/ASPNETCore_Webpack
Thanks Webpack, lets use it
First off, it’d be nice to keep our “Dev builds” but also have “Production builds” too.
At the top of the webpack.config.js we’ll add the following code
const prod = process.argv.indexOf('-p') !== -1;This is nice and simple, it just sets the flag prod to true/false depending on whether an argument -p was supplied when running Webpack.
Next, we’ll add a new npm script to enable us to run a production build from the npm command prompt.
Open package.json and add the following JSON to the scripts section.
"build:prod": "webpack -p"

Running npm run build:prod from the command line will now output some minified JavaScript files for you.
That’s great, but what about these hashes I was talking about?
Well, now all we need to do is tell webpack the format of the filenames we want outputting.
I’m going to use the format [name].[hash].js for production builds and [name].js for dev builds.
In webpack.config.js replace the output:filename value with the following:
filename: (prod) ? "[name].[chunkhash].js" : "[name].js",The chunkhash is a Webpack place holder and will insert the file’s hash in that position when outputting the file.
This uses our prod flag from earlier and switches the filename format
Run npm run build:prod again and you should see output in your command prompt like this:
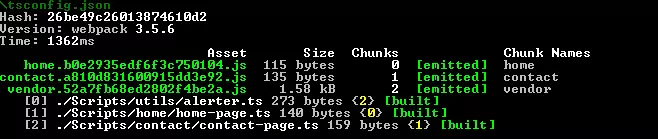
And in our wwwroot folder we should find the following files:

Awesome, that all works. However some of you will be thinking “That’s great, but the filenames will be changing everytime we modify the JavaScript/TypeScript, does that mean that we’ll have to manually update our Razor views (<script></script> tags) everytime we deploy?” - i.e. there’s still manual work to be done…
The C# bit
Currently the answer to the above is “Yes”, if I left the blog post here, then there’d still be manual work to do, everytime you do a new production build. We’ve used a couple of the features of Webpack and it’s got us quite far. However there’s one more that will help us link up our Razor Views and our JavaScript filenames.
We could write a C# class which allows you to give it a partial js file name e.g. home.*.js and then it’ll look in our wwwroot folder and pick up the file and then render that in our script tag. However, what if we’re not cleaning out our wwwroot folder after every TypeScript build? (by the way, I’m not), what will happen then? It’ll just pick up a random version, or maybe we could look at the date/times on the file and always pick the newest with a hash in…?
You CAN do that, but in my opinion, you shouldn’t. I prefer to be more specific and don’t like relying on the above to “hopefully” pick up the correct file.
Webpack - Stats module
We can use the Webpack stats module, which will generate a .json file detailing all the files it has outputted.
So we can find the exact file name (hash included) for a given entry point.
To turn this feature on in Webpack, we’ll add a new section to the plugins section in webpack.config.js:
// Output stats.json
function () {
    // When webpack has finished
    this.plugin("done", function (stats) {
        // try and find a "Webpack" folder
        var wpPath = path.join(__dirname, "Webpack");
        if (fs.existsSync(wpPath) === false) {
            // If it doesn't exist, create it
            fs.mkdirSync(wpPath);
        }
        // write the stats.json file to the Webpack folder
        fs.writeFileSync(
            path.join(wpPath, "stats.json"),
            JSON.stringify(stats.toJson()));
    });
},
Also, don’t forget to “require” fs at the top (add filesystem library)
var fs = require("fs");After running npm run build:prod you’ll notice a new file in the folder Webpack called stats.json
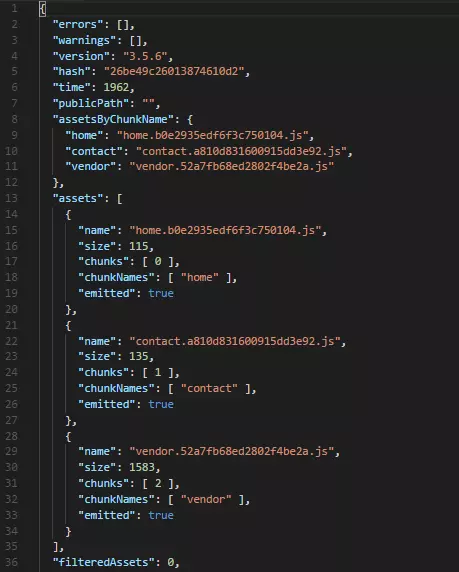
The contents (when formatted nicely) should look like this:
~ GIT TIP ~ you’ll probably want to exclude stats.json from source control as it changes so frequently and is “auto-generated”. I’ve included it as part of my Git Repo, to show you what it looks like.
If you want rid of it, add the following line to your .gitignore file:
## Webpack output
**/stats.json
Hooking up with C#
Now we’ll want to create a C# helper which will read this file, build up a list of files that Webpack has bundled and then allow us to ask for “home” and get (e.g.) home.f8a8d8g8.js in return, which we then put in a script tag.
I’ll be running through the stats.json file in my Startup.cs class, and then keeping a Dictionary<string, string> of the entry points to filenames.
This dictionary will created and filled once, and will be around for the lifetime of the application as this is good for performance (not checking filesystem regularly) and ideally if we changed any front-end code, we’d re-build and re-deploy the application. Not change the live environment and run npm run build:dev on live website.
I’ve created a class called WebpackChunkNamer in the Webpack folder which holds stats.json.
This class’s responsibility is populating the map of entry points to filenames and for returning the filename for a given entry point. It looks like this:
public static class WebpackChunkNamer
{
    private static Dictionary<string, string> Tags { get; set; } = new Dictionary<string, string>();

    public static void Init()
    {
        using (var fs = File.OpenRead("Webpack/stats.json"))
        using (var sr = new StreamReader(fs))
        using (var reader = new JsonTextReader(sr))
        {
            JObject obj = JObject.Load(reader);

            var chunks = obj["assetsByChunkName"];
            foreach (var chunk in chunks)
            {
                JProperty prop = (JProperty)chunk;
                Tags.Add(prop.Name, (string)prop.Value);
            }
        }
    }

    public static string GetJsFile(string filename)
    {
        return Tags[filename];
    }
}
Nice and simple!
We’ll call the Init() method from Startup > ConfigureServices

Calling from Razor
All that’s left to do is access this class from a Razor view. For this I’ll be using partial views, however you could get really fancy and use components or even tag-helpers. The concepts remain the same though: output a script tag with the correct filename in.
Create a Partial Razor view in “Partials” and call it _Script.cshtml
With a very simple implementation:
@model string

@using WebpackPart2.Webpack

<script charset="utf-8" src="~/js/@WebpackChunkNamer.GetJsFile(Model)"></script>
Now, we’ll call this Partial view from the “Home” and “About” pages.
First we need to change our vendor script declaration in _Layout.cshtml
Change the script tags to this:
@Html.Partial("~/Partials/_Script.cshtml", "vendor")In the “Home” page:
Instead of
@section Scripts {
    <script src="~/js/home.js"></script>
}
We now have
@section Scripts {
    @Html.Partial("~/Partials/_Script.cshtml", "home")
}
Do the same for the “Contact” page.
WE’RE DONE!!!! You’ve now got Webpack generating unique (cache-busting) filenames, that will work in production (and dev)! Being added to your views via C#, which only requires you to know the “entry point” name!
This is awesome, because this Setup will work if you’re running npm run build:dev or npm run build:prod
If you are running the prod version, remember that your filenames change on every TypeScript change, therefore you’ll have to Restart your Web Application, to run the WebpackChunkNamer.Init(); again.
Closing
I hope you’ve found this useful. I’ve recently heard things like “Webpack doesn’t really lend itself well to non-SPA web applications” and I think that is massively incorrect. Hopefully the above proves that Webpack can be used in a Non-SPA application and it actually fits in quite well. In my opinion the above feels more “complete” and definitely feels tighter than perhaps using the Microsoft ASP.NET Core Bundler & Minifier or other “vendor specific” implementations. In my opinion, using Webpack is a better bet, the skills/concepts learned here are more “cross-language/discipline” than using something that is tied to a particular web application framework
Again, hope this helps and if you’ve got any improvements/comments then get in touch below or on Twitter